Sunday, November 1, 2020

Christmas Card

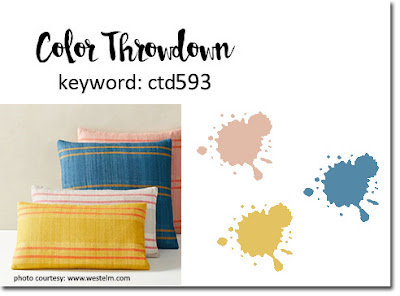
 Today, I played along with the  Color Throwdown #617


This color scheme felt Christmas-y, so that is what I went with, especially since I am still in need of a couple of Christmas cards. This card was a little bit of a test run for our family Christmas card minus the family photo. Still, a few things to figure out, but I'm definitely closer to my final design.


The kraft piece is embossed with a swiss dot design and the edges are embossed with gold embossing powder. I also sprinkled a little embossing powder on the piece and heated it. I like the rough gold edges and the sprinkles of gold on the base. I adhered the kraft piece flat onto a deep red card base. The green piece was created on Tim Holtz watercolor cardstock and Distress Ink blending with Twisted Citron, Shabby Shutters, and Pine Needles inks. The sentiment is from Simon Says Stamps Inside Christmas Greetings stamp set. I splattered it with Perfect Pearls and added embossing powder like I did on the kraft piece. Then, the piece was die cut and adhered with foam tape. The Eucalyptus dies were created much like the sentiment piece, except that more Pine Needles Distress Ink was used and I added Tim Holtz dry glitter with Multi-Matte Medium. I finished the card with some bakers twine from my stash.

Sunday, October 25, 2020

Crackling Campfire

Today, I wanted to play with Tim Holtz's newest Distress Ink color- Crackling Campfire. I had seen it ink blended and I knew there was a yellow undertone. I decided to use it as an ombre gradient watercolor. I like how the color deepens as it moves from left to right across the watercolor cardstock. 

I used Freshly Made Sketches #458 as a guide as I created. 


Before I added the Crackling Campfire ink, I heat embossed the feather images in gold embossing powder. Both feather stamps are from an older Cocoa Daisy stamp set. Once I completed the embossing and watercoloring, I added a few water splatters and some Perfect Pearl splatters in Heirloom Gold to the piece. After drying the piece completely I used my fingernail to rough up and distress the edges. Using an ink blending tool, I went around the whole piece with Crackling Campfire ink. I adhered the panel to the kraft card base and added sequins and gold Stickles. The "thankful" sentiment is from an older Technique Tuesday/Ali Edwards stamp set. There is also a crosshatched background peeking out from behind the raised panel. It was created using an older Cocoa Daisy stamp. 


I am already making a list of more techniques to try with this beautiful color. 


More Embossed Watercoloring

 I decided to play along with The Color Throwdown this week. The color scheme was a good one and could definitely be a fall or Christmas scheme and I decided to go with Christmas because I need a few cards outside our annual family Christmas card. 


For my card, I used Neenah Desert Storm cardstock as my card base & I die cut the Tim Holtz Holiday Green Thinlit Die with it as well.  I used a scrap piece of cranberry cardstock as the mat for my watercolor cardstock. It wasn't quite big enough, so I used gold striped washi tape to finish the mat and add interest. I love the look of gold embossing and kraft together, which is why all of my embossing is done in gold embossing powder. The doily background stamp is from an old Cocoa Daisy kit. The cranberry watercolored images were created using Victorian Velvet and Aged Mahogany Distress Inks and the stamp I used is from the Simon Says Stamp Delicate Flowers stamp set. The pointy leaves are also from the Delicate Flowers set and were stamped and embossed onto vellum.  I used a little Antique Linen Distress Ink to add a little khaki color to them. The card was finished with a greeting from a Christmas stamp set I picked up at Michaels, then I added Perfect Pearl Splatters in Heirloom Gold and sequins and gems from my stash.


I love how this one turned out! I'd like to try this color scheme again with a Poinsettia stamp, so I guess I need to find a good one and get it ordered quickly!


Sunday, August 2, 2020

Watercoloring & Embossing on Vellum

In my last post, I mentioned playing with older supplies. I enjoyed playing with my Twinkling H2O's so much that I wanted to continue using them. I am amazed at how much I have used them through the years and how much of them are still left. I'm not sure they are still be made, so I'm glad they don't get used up quickly.

I was excited this week to see Freshly Made Sketches #446. I have been intrigued by slimline cards here lately as I have begun to see more and more of them being made and shared on social media. I thought this was the perfect week to try one.


I pulled my inspiration from a decorative piece I made a few years ago that hangs on one of my inspiration boards. 


Using the same color scheme and vellum I created a slimline card with a similar feel.


Heat embossing on vellum can be really tricky. The best advice I can give is to go slow and hold the embossing gun as far back as possible from the vellum while you are embossing. That way it will reduce the warping or burning of the vellum. 

The stamped leaves came from an older Cocoa Daisy stamp set and are no longer available. They are stamped with Versamark ink & embossed with white embossing powder. My favorite white embossing powder is Hero Arts White Embossing Powder because it is a crisp, clean white. The leaves are watercolored with Twinkling H2O watercolors. Once dry, I buffed the images to remove any watercolor that bled onto the white embossing. 

The sentiment is from the Simon Says Stamp Thanks and Leaves stamp set and is also embossed in white embossing powder.


I used foam tape behind all the bigger leaves to adhere the vellum piece to the white card base. I finished the card with a sprinkling of sequins from my stash. 

This card made me question why I don't play with the vellum in my stash more often. It was a fun card to make and makes me yearn for the cooler temperatures of fall. 


Embossed Watercoloring

This week I began digging around through some of my older supplies, simply looking for something to create with & ended up pulling out some things I haven't used in a long time:

-An older embossing folder from Sizzix ( I think it came in a two-pack from Hobby Lobby)
-Twinkling H2O's Shimmering watercolor paints  (I bought these many years ago from a local shop)
-Two of my favorite pumpkin woodblock stamps from Hero Arts (old, old.....really old)
- A small scripty sentiment stamp from Ali Edwards (way back when she was making stamp set with Technique Tuesday)

I decided to try watercoloring the recessed portion of my embossed image with Twinkling H2O's in the color Copper Penny. It was definitely redder than I wanted since I was playing along with The Color Throwdown #604 color palette, but I decided it could be considered terra cotta, so I went with it. Here is the inspiration piece and my card is underneath.


I figured out that watercoloring the recessed part took much longer than expected and required a steady hand. I love white pumpkins in the fall, so I decided to make my pumpkins white, but I didn't want them to be stark white and blend into the white in the background. So I adhered some pages from an old dictionary to some white cardstock and then stamped and fussy cut the images. Because they now had a mixed media kind of feel, I splattered them in Perfect Pearl Mists in Sunflower Sparkle (brighter gold) &  Heirloom Gold (vintage, darker gold). I still have both of these as mists, but Ranger has discontinued making the mists. Once I run out I plan to buy the powders and mix them with water to replenish my mists (Probably using the same mist containers and mixing a full jar of powder and water to fill the jar). 

Once I layered the embossed piece on top of the black cardstock it felt unfinished and that it was lacking something. I decided to add gold embossing powder along the edges of the embossed piece to give it more definition. I love the way it turned out. 

The stamped pieces are sitting on a scrap of black cardstock with the gold embossed Ali Edwards sentiment. I wound some black thread around my fingers and then sandwiched it messily between the embossed piece and the pumpkins. Sequins are from an older Simon Says Stamp release. 

I had not played with some of those materials in years and I love that I was able to dust them off and make something that doesn't feel dated.

 Love how this turned out and how it pushed me creatively.


Monday, May 25, 2020

Sunshine Card

This week I spent some time playing with brighter colors that have a summery feel. One of the cards I created using the Freshly Made Sketches #436. This is such a versatile & fun sketch, that I have more cards planned using it.


Here is what I came up with:


The card also has a matching envelope design, which was created using the same Tim Holtz Rays stencil along with Distress Ink in Mustard Seed and Carved Pumpkin. The blue background patterned paper is from an older 6x6 paper pad and it is layered on top of a Neenah 80lb card base. The shaker is filled with a mix of iridescent & Simon Says Stamp Summer Gold sequins. The sentiment is from an older Simon Says Stamp set & is stamped in Archival Jet Black ink. 

I love the summery feel of this card and it will soon be headed to a close friend who always makes me feel better when I'm feeling down.

Thanks for stopping by, I hope you are getting a chance to feel warm, sunny days in your part of the world.  

Thursday, May 21, 2020

Spring Floral Card

How about a Clean and Simple Card?  I love the sketches at CAS(E) this Sketch. The sketch always pushes my clean and simple abilities. I always tend to overthink/spend a ton of time producing cards, but when I use the CAS(E) sketch I try to think more simply and work quickly to complete a card.


Here is what I came up with. 


I limited myself to two stamp sets, one for the florals and one for the sentiment. The sentiment is from an older Ali Edwards for Technique Tuesday stamp set and the florals are from an older Hero Arts stamp set (Color Layering Let Love Grow) stamp set. 

I stamped the solid images in different light color Distress Inks around a penciled-in circle the size of the sentiment circle. I then misted the solid images with water and let them dry. I added detail stamped images, from the same stamp set, in darker shades on top of the dried solid images. 

The sentiment is stamped in Archival Jet Black ink and clear heat embossed. To finish the card I added sequins from my stash and stamped a matching envelope.

Love how this one turned out. 

Thanks for stopping by!


Monday, May 18, 2020

Embossed White Backgrounds

Today's cards were made using a sketch from Freshly Made Sketches (#435)


Both of these cards were created using embossing folders to create a simple white embossed background. The embossed background adds another element to the cards without adding another color or distraction.

I created this first card using an older stamp set from Simon Says Stamp. The background is embossed using an embossing folder I picked up at Michael's a year or so ago. All the stamped images are watercolored with Distress Inks. The patterned paper pieces are remnants left over from a Simon Says Stamp Card Kit. Sequins are from my stash. I love how this one turned out with the little popsicle images as the diagonal piece.


This card is created much the same. The paper pieces are remnants from older kits or from my stash. The embossed background is from Michael's, I picked it up when I bought the ice cream embossing folder. I have a hard time passing up "summery" products. The stamped sentiment is from an older Simon Says Stamp set. The sequins & rhinestones are from my stash, I think the rhinestones are actually from Hero Arts, from their first line of rhinestones they put out ages ago.


Each card has a matching envelope.

I love digging through older stamps/supplies and using up my stash of stuff. It's a really big stash & I feel very accomplished when I use things up. 

Thanks for stopping by!


First & Second Generation Distress Inking

Today I made a couple of cards inspired by Color Throwdown #593


I stuck to a pink, yellow, and blue color scheme, but decided to use brighter colors (especially the pink) than the ones in the inspiration piece. 

This first card was created using a Crafter's Workshop stencil ink blended with Mustard Seed, Picked Raspberry, and Peacock Feathers Distress Inks. I also sprayed the ink-covered stencil with Perfect Pearls pearlized water and used it as a stamp on the background. Then using an older stamp set from Simon Says Stamp, I stamped the two bikini's repeatedly across the background in black ink & coated them with Glossy Accents. The sentiment is from the same stamp set and is stamped in Peacock Feathers Distress Oxide Ink. I finished the card with sequins from Lucy's Cards. 


 The second card I created using the ink residue from the first card. I stamped the still slightly inky stencil onto watercolor cardstock and lightly inked over it using the same Distress Ink colors (residue on ink blending tools) I used on the first card. I used another older stamp set from Simon Says Stamp to create the ice cream images and the stamped sentiment. The stamped images are watercolored with Distress Inks. Sequins are from Lucy's Cards.


Both cards have matching stamped envelopes.

I enjoyed creating each of these and love how summery and fun they feel. 

Thanks for stopping by!


Monday, March 16, 2020

Bit and Pieces

Last week I cleaned out my scrap drawers. I have a three drawer plastic storage container that I bought at Walmart years ago. It will hold 12x12 paper, but I use it strictly for scrap pieces. Occasionally I go through it and cut down the scraps and move them to a box on my desk. When I am working on cards, scrapbook pages, or other projects, I then try to reach into that scrap box to find pieces to use rather than cutting down more 12x12 paper.

To make my scrap creating quicker and easier, I used a sketch from Freshly Made Sketches for my card design.
 Today's card comes completely from that scrap box and from card bases I had cut down and made a while back. The stamp I used is an older 3x3 butterfly image from Jenni Bowlin & is no longer available. 


 It feels good to use up scraps that have been around awhile. I also used colors that I don't always reach for. It was a good opportunity to step out of my comfort zone and create something from older bits and pieces.

Distress Watercolor

Distress watercolor is my favorite way to color images. Today, I was inspired by the Color Throwdown #584. I also love the fact that the color combo was all in greens, which is my favorite color.


I decided to make a thank you card because I am always needing to thank someone. Writing & sending thank you cards, or any card for that matter is something I struggle with. I am making a conscious effort to make and SEND more cards. 


Today's card is similar to one I have made in the past, but I seriously love this leaf image from the Delicate Flowers stamp set from Simon Says Stamp. The sentiment is a combination of words from the Delicate Flowers set and the Beautiful Flowers 2 stamp set from Simon Says Stamp. I stamped & embossed the sentiment and leaf images in Black Archival Ink and clear embossing powder. I then pressed Distress Ink pads in Shabby Shutters, Mowed Lawn, and Peeled Paint onto a clear stamp block. Then using a small watercolor brush I dropped and moved color and water into each of the leaves. I finished the card with a splattering of leftover Distress Ink and a spritz of Perfect Pearl water. The sequins and gems are from the Palm Sparkly Shaker Mix by Lucy's Cards.

Thanks for stopping by and looking. 


Monday, February 10, 2020

Simple Ink Blended Valentine

I'm trying to jump back into taking the time to be creative. I just haven't had a ton of creative mojo since Christmas break, so I decided to spend some time on Saturday rearranging and reorganizing my craft space. My goal was to clean up and pull out a few supplies to use and then walk away so that I could come back on Sunday and create. My plan worked well, yesterday, I was able to finish a card and complete the tags for my 1st grader's Valentines.

I used The Color Throwdown color scheme to make a simple ink blended Valentine card for my husband.


Here is what I came up with:


I first created an ink blended strip using Chipped Sapphire, Tumbled Glass, and Tattered Rose Distress Inks, which I then covered with Perfect Pearl drops that I flicked on haphazardly with a small paintbrush. I then die cut the blended strip using an older Simon Says Stamp heart confetti die. I used the negative die cut space to help me place my pieces back together correctly on the front of the card base (I plan to create another card using the leftover negative space). On scrap watercolor paper I ink blended Chipped Sapphire Distress Ink and flicked Perfect Pearls on top. I cut out the word love three times (twice using scrap white cardstock and once out of the sapphire piece) using the SSS Love Shadow Wafer Die,  then I layered them together and placed them over the hearts. I finished my card with sentiments from a SSS love stamp set that matches the die. Both are from an earlier SSS collection called: Hey Love. I also added a few sequins from my stash.

The completed card base was popped up on shimmery navy blue cardstock and then glued onto a white card base. A coordinating envelope was stamped as well. 

I am pleased with the results and that even though this is a card intended as a Valentine for my husband, it does not scream Valentine reds and pinks. It's more masculine look will definitely appeal to my husband,